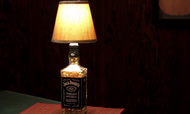
DIY Guide - How to Make a B22 Bottle Lamp
Posted by Richard Hobbs on Oct 02, 2023
Bottle lamps have become a popular and creative way to upcycle old glass bottles into stylish and functional lighting fixtures. If you are looking to add a unique and eco-friendly touch to your home décor, making a B22 bottle lamp is a great project to undertake. With a few basic tools and a bit of creativity, you can transform an ordinary glass bottle into a beautiful and custom-made lamp that will brighten up any room. Today, we’ll walk you through the simple steps of building your own bottle lamp!
Materials Needed:
Before you begin, gather the following materials:
To make a glass bottle lamp, you will need the following materials:
●A glass bottle
●A B22 lamp holder
●A B22 LED bulb
●A plug and cord set with an in-line switch
●A lampshade (optional)
●A drill with a diamond bit
●A rubber grommet
●A screwdriver, pliers, wire strippers, and wire cutters
●Epoxy or silicone adhesive
Don’t have all of the above? We sell pre-made bottle lamp kits that have everything you need to get started.
Step-by-Step Instructions:
Now, let's dive into the step-by-step process of making your B22 bottle lamp:
- Prepare the Bottle:
- Remove any labels or stickers from the bottle and ensure it's clean and dry.
- Choose the location where you want the cord to exit the bottle. Typically, it's best to drill this hole near the base, but you can choose a location that suits your bottle's design.
- Drill the Hole:
- Attach a diamond drill bit to your drill.
- Place the bottle on a stable surface and start drilling slowly at the chosen location.
- Add water periodically to keep the drill bit cool and prevent cracking.
- Once you've created a hole, use sandpaper to smooth the edges.
- Insert the Rubber Grommet:
- Insert the rubber grommet into the hole you've created. This will protect the cord from sharp edges.
- Wire the Lamp Holder:
- Follow the manufacturer's instructions to wire the B22 lamp holder.
- Typically, you'll need to strip the wire ends, connect them to the lamp holder's terminals, and secure them with screws or clips.
- Once wired, attach the lamp holder to the top of the bottle using epoxy or silicone adhesive.
- Attach the Plug and Cord Set:
- Wire the plug and cord set to the lamp holder, following the provided instructions.
- Make sure you have enough cord length for your lamp's intended location.
- Install the Bulb:
- Screw the B22 LED bulb into the lamp holder.
- Test the Lamp:
- Plug in your lamp and switch it on to ensure it's working correctly.
- Optional: Add a Lampshade:
- If you'd like to enhance the aesthetics of your bottle lamp, attach a lampshade that complements your decor.
Making a B22 bottle lamp is a fun and creative DIY project that allows you to turn an ordinary glass bottle into a functional work of art. With the right materials and some patience, you can create a unique and eco-friendly lighting fixture that adds character to your home. Whether you are looking to brighten up your living space or give a personalized lamp as a gift to someone special, making a B22 bottle lamp is a satisfying and rewarding experience. Enjoy your new lamp and the ambiance it brings to your surroundings!


